Historical Miniatures Wargaming on the Cheap
A Guide to Getting into the Hobby Inexpensively
By Arofan Gregory, copyright (c) 2025. All rights reserved.
By Arofan Gregory, copyright (c) 2025. All rights reserved.
Historical miniatures wargaming can be a very confusing hobby to get into, and, in addition to being confusing, it can also be very expensive. There are many different vendors trying to convince you to buy their products, and none of it comes cheap. This is especially true of those games which are easy to pick up, because they are pre-packaged: those vendors charge extra for making it easy to do! (In their defense, it is a lot of work, and they are providing a real service for those who have the money for it.) But getting into historical miniatures doesn't have to break the bank.
This article is the result of a challenge I set myself: what is a good, cheap way to get into the hobby with a minimum of expense and effort? The goal is not to have a few badly painted miniatures, some shabby cardboard terrain, and a copy of One Hour Wargames (although that would certainly be one way to do it, and seems to be a pretty comon one), but to have two sets of "normal" painted miniatures, some reasonable terrain pieces, and a game which you will actually want to play, even after you start spending a lot more money. This goal leads to two questions: What exactly does a beginner have to do? And: How much will it all cost?
Often, first efforts produce sub-optimal results not because of a lack of skill or willingness, but because the beginner doesn't know what to do. The skills required to create terrain and paint miniatures are not difficult to learn, even if they can be hard to really master. Most of us who wargame our whole lives never become "masters" at any of it, and still spend many years happily painting figures and terrain to an acceptable standard for the gaming table. This article aims at providing a road-map for beginners, giving just enough information to get the first project started and finished. The goal is to have a small-but-complete set of terrain, figures, and rules, so that a "proper" miniatures wargame can be played. Game on!
I decided to leave the choice of scale and period up to my wallet, but I also wanted to select a period which is generally appealing to a majority of wargamers. Judging by popularity, the main ones still seem to be WWII, Napoleonics, and the American Civil War, followed by Ancients of different types. Further, I wanted to play the kind of games which are broadly popular within that period: yes, you can play fun Ancients skirmish games, but that is not the typical way of it. When people play ancients, they play full battles. Likewise for Napoleonics and the ACW.
This almost immediately narrowed the field to WWII, because any full battle game is likely to require an initial investment in many different types of troops (infantry, cavalry, artillery, etc.) for both sides, and in fairly large numbers. WWII is a period where "skirmish" games such as Bolt Action are immensely popular, however, requiring an absolute minimum of figures, and all of a single basic type. (You could almost get away with American Civil War here, as you only really need infantry and artillery, but the numbers of figures would be larger than for a WWII game like Bolt Action where you are only putting twenty or thirty figures on the table for each side. A full battle game without lots of figures doesn't really look right.)
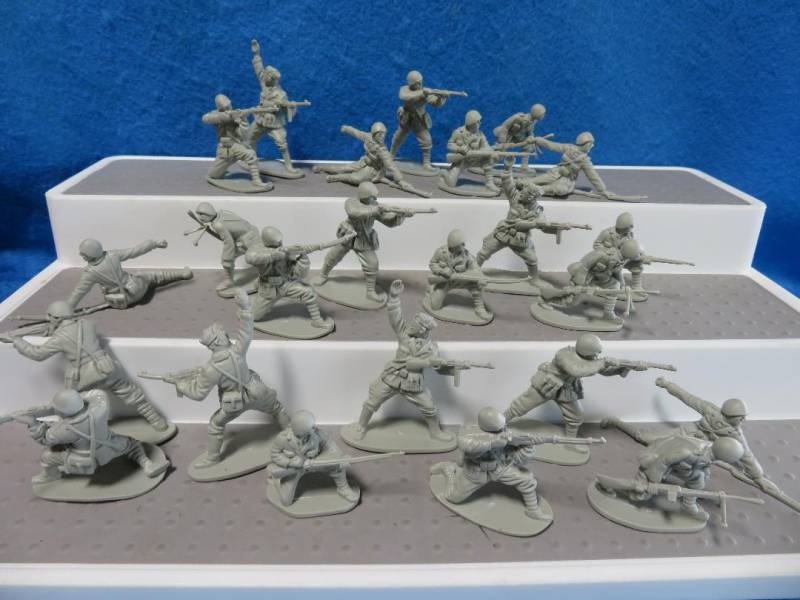
So, what scale? Although 15mm figures are cheaper than 28mm, they are really not that much of a bargain: you need more of them to look good, and they are not generally used for skirnish games because of their diminutive size. Even so, they generally cost less than $1.00 apiece (USD). But they come with some downsides: they are difficult to paint for beginners because they are so small, and they are harder to see for the uninitiated who do not know what to look for (e.g., how can you tell a BAR gunner from a regular rifleman?) Twenty-eights would be preferable for skirmish games, and the hard plastics are sold in boxes which cost about $30.00 - $35.00 each, and provide enough figures for a reasonable platoon. Twenty millimeter (1:72 or 1:76) is a consideration, because boxes of soft plastics are very inexpensive, about $20.00, and have almost 50 figures in them. In the past, 20mm was the "standard" WWII miniatures scale, but that seems to have given way to 28mm in recent decades.
Another option, especially since we are looking at skirmish gaming, is to think about 54mm (1:32 scale). The number of soft plastic figures now available is really large, with lots of re-releases in the recent past. In many cases these are effectively cheaper than 28mm. Let's say we want to do a classic match-up between German Wermacht and US Infantry: I can buy figures from Classic Toy Soldiers or BMC - enough for a couple of squads - for about $20.00 for each side. You have to be careful to get the more historical-looking figures (typically recasts of Airfix or Marx) but these are becoming increasingly common. A set of 30+ figures for $20.00 means that 54mm soft plastics are effectively the same price as 15mm miniatures. They have a benefit over 28mm and 20mm as well: they are bigger, so they are easier for beginners to paint. The downside compared to hard plastic is that they require a bit of special treatment to make the paint stick and to not flake off, but this is not a huge deal. You need to prime before painting, and you need to seal afterward with a clear coat anyway, even if priming is a little more involved with soft plastics.
So, having selected WWII skirmish as a basic period, our scale will either be 28mm or 54mm. The former will cost us around $65.00 for two boxes of miniatures, and the latter more like $40.00. For the purposes of this article. I decided to go down the 54mm route, even though there are good reasons why spending a few extra dollars up front and making the effort to paint the smaller figures will often pay dividends: 28mm has become the typical scale for this type of WWII game, and represents a better investment in the longer term. More people game in this scale, and it will be easier to find opponents and to combine your forces for bigger games. But there are already lots of resources out there for starting with 28mm figures, so I will follow the less-expensive, less-popular path here, since there are a few tips which are not obvious when working with soft plastics, but which can make a huge difference to the beginner. (At the end, I will price both options, however. And as it turns out, 20mm soft plastics basically cost the same as the 54mm soft plastics do - you just get more figures per box, and you don't need them all.)
There are a few other things which will be required in order to play a proper game. First, we need to get a set of rules. We have talked a lot about Bolt Action, but there are other options out there. Chain of Command is another game which uses almost the same figures as Bolt Action and is also hugely popular (they require more specific figure types). There are lots of skirmish games for WWII figures out there. I earlier mentioned Neil Thomas' One Hour Wargames which is not a system I particularly enjoy (unlike some of his other efforts), but there is a similarly titled (but unrelated) One Hour Skirmish Wargames by John Lambshead which has a set of WWII rules in it. This is actually not a bad skirmish game, and it uses fewer figures than the other games named here. Also, it is simpler to learn and much cheaper: you can buy it on Amazon for $22.00. (By comparison, Bolt Action will cost you $40.00 and then another $50.00 for two sets of special dice, and Chain of Command will run you almost $50.00.) Since all these games use singly based, historically organized squads, with each miniature representing a single man, there is no good reason not to start small with a set like One Hour Skirmish Wargames and work up to the more expensive, figure-intensive games. The whole idea here is to get gaming as soon as possible!
Another expense here is terrain. While people like to ignore or fake it, this is always a mistake. Even the best-painted armies do not show well on a bad-looking table. It does not have to be a masterpiece, but it does need to be presentable. This is not as expensive as you might think, and does not require a lot of money if you are willing to do a little work. A minimum terrain set will require a ground cloth, some trees, some shrubbery, some roads, and some rocky outcroppings and/or stone walls. The cheapest way to get a good ground cloth is to buy an olive-drab military blanket, which will cost you about $20.00. Alternately, you can buy a dedicated grass-pattern game mat of a smaller size (3' x 3' or 4' x 4', for example) for about $35.00. This is an important part of your equipment, and you will use it for a long time to come. (Do not under any circumstances use Kelly green felt fabric. This was once a staple of historical miniatures wargaming, and even then it always looked like Hell. Just don't do it!)
Good-looking roads are easy to get, if you know what to buy. What you want is 2-inch-wide anti-slip tape, in brown. A roll will cost you around $10.00. This looks realistic (it is covered with a sandy texture), it is durable and reuseable, and one roll has enough to last you for a couple of years unless you start gaming on really big tables. The trick is to never peel the backing off, but simply to cut it into the needed lengths and lay them on the table. Another easy-to-buy terrain feature you will want is a bag of large foliage clusters (Woodland Scenics makes these) in green. A bag of these costs $10.00 and is endlessly reusable - you just store it in a ziplock baggy and place it as neeeded on the table while gaming, to represent shrubs and undergrowth. It looks great.
Rocky outcroppings (and even stone walls) can be made by using actual rocks and gluing them together on a piece of thick card stock using white Elmer's Glue-All (not School Glue - this matters because School Glue can dissolve when you paint it). Once glued together, you can add some flocking on the bases and glue a couple of foliage clusters on. Note that you will need to buy some green flocking material - a bag of woodland scenics Fine Turf is perfect. This costs around $5.00. (Do not get the fibrous stuff - it is harder to work with.) Once it's all together, you will want to seal the terrain piece using a clear matt varnish such as Rustoleum 2X Ultracover Matte Clear. A can of this costs around $6.00.
Note that the flocking, glue, card stock, and clear sealant are all things you will use for many different purposes. For card stock, you can use any dense cardboard, but something really thick and sturdy like mat board is highly desireable. Thin card stock is really hard to pick up and it falls apart under the stress of actual gaming. A pack of mat boards will cost around $10.00 and last you for a long time (note that you will need to cut it with an Exacto knife and a straight edge - it is very dense).
One last necessity for the terrain set-up are some trees. I strongly recommend buying a set of model trees from Amazon. You can get a pack of 32 of these, up to about 6" tall, for $12.00. You will take these, mount them on pieces of card stock, glue some small rocks to the base to weight it and keep it upright, and then flock the base and spray the whole thing with varnish. This produces a good-looking wargames tree which will last you for a long time. Note that you cannot easily mount these trees on thin card stock - it must be thick enough to drill a hole through to hold the tree stem. Again, mat board is perfect.
A table which has roads, trees, brush, and some rocky outcroppings will look good, and provide a range of terrain for you to fight over. Another key element which is easy to make are hills. To create these, buy a sheet of cheap seat cushion or matress foam 1" - 2" thick, cut into the shape of a hill (as seen from above), and scallop the edges upward and inward with a pair of scissors. The hill looks like a flat-topped plateau, and can be spray painted grey and then heavily dusted with green flocking while still wet. The flocking will dry in place. The result is a durable wargames hill which, if you have them in several different sizes, can be stacked to produce more interesting features. The foam is a bit expensive, however, and you will need to buy spray paint and more flocking. You will probably lay out about $30.00 all told if you want to do this, so it can probably wait.
If you have a 3D printer (or know someone who does) there is a huge amount of terrain available on Thingiverse for free which can be printed - just search for what you are looking for. While PLA material does not make the nicest miniatures for wargaming - resin printing is much better for that - it can make excellent terrain and even reasonable vehicles. This goes beyond what we are discussing here, but is worth looking into, especially if you know someone who owns a printer, or you have access to a MakerSpace.
So we now have a good-looking battlefield for our soldiers to fight over, but they are not yet ready - they need painting. Regardless of scale or material, almost all wargaming miniatures must be cleaned and primed, painted, and then finished with varnish or a sealant. Depending on the material of their manufacture, the products used for this can vary. While there are lots of specialized products for all of these stages, there are also cheap and completely serviceable generic alternatives. Since we have decided to paint soft plastic 54mm (1:32) soldiers, we will look at what is needed specifically to do that, and point out where other materials (like hard plastic or metal) might be different.
Cleaning and priming is always the first step. The figures should be washed in soapy water and then wiped dry, to remove any lingering mould chemicals. (This step is typically not needed for other materials.) Following this, any flash should be trimmed away with a sharp Exacto knife. Unlike other materials, soft plastic cannot be bent back into shape. Instead, the parts of the figure which need to be straightened should be waved through a column of steam from a kettle (or dunked into almost-boiling water), straightened with the fingers, and then plunged into cold water to make the new shape "set". This only works with soft plastics, but it is almost always necessary for some of the figures in a set.
Once figures are cleaned, they need to be sprayed with a primer which will adhere to soft plastic. A can of grey plastic primer (I use Rustoleum 2X Ultra Cover) costs about $7.00. Once the primer has completely dried, the figures should be coated in black acrylic paint, brushed on. (Black acrylic paint is the normal "primer" I would use on metal figures, or hard plastics or 3D printed PLA, but soft plastics need that extra undercoat or none of the regular paint will stick.) Before painting, it may help to glue the figures to small squares of throw-away cardboard with a dab of white glue. This makes it easy to hold them.
For paints, I use hobby acrylics which can be bought at craft stores or Walmart for very cheap. These come under brand names like Apple Barrel or Delta Ceramcoat, and they cost about $2.00 for a 2-ounce bottle. You will end up using a lot of black and brown, so it is worth getting these in larger 8-ounce sizes. You should always buy the paints in a mattte finish - never gloss. You can mix the paints to produce colors which are not sold commercially, and all clean-up and thinning can be done with water. You will need some watercolor brushes with extremely fine tips (0, 00, and 000 are all good), and a few larger ones. You should be able to get away with buying all needed paints and brushes for around $30.00, and possibly a bit less.
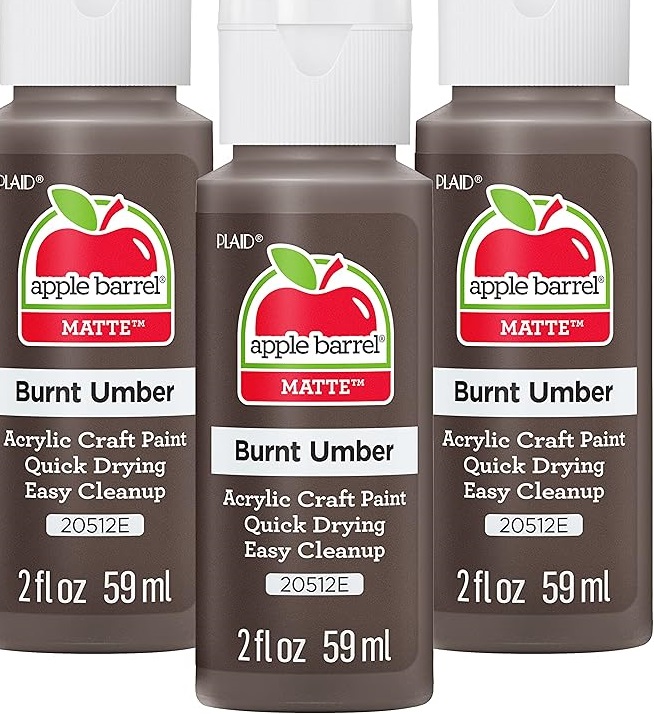
Apple Barrel is a typical brand of acrylic hobby paints which work well for painting miniatures and are very inexpensive. There are several other, similar brands, such as Folk Art for metallic colors.
You do not need every color under the sun. One nice thing about 54mm soft plastics is that they tend to be sculpted with minimal equipment, so fewer paint colors are required. To do my WWII German Wehrmacht and US Infantry figures, I needed only eight colors:
To understand what colors you should paint the figures, it is very useful to Google images, and simply follow what you see. There are lots of sites and videos which will explain how to paint specific figures, but stick with a very basic style of painting. Avoid "dry brushing", "washing", and similar, more advanced techniques - you will have plenty of time to learn these after your first game is on the table!
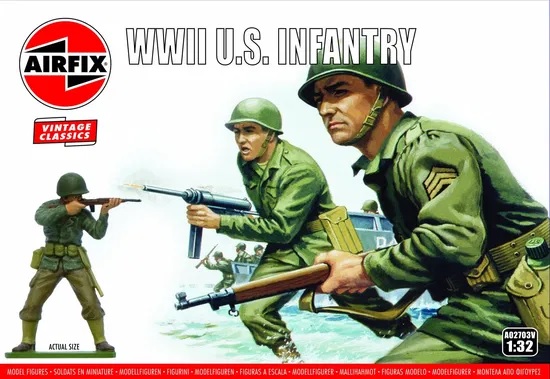
Box art from companies like Airfix is a great way to get an idea of what colors to paint your soldiers. Here is a good picture of US infantry, which wore a wide variety uniforms in shades of green and olive drab.
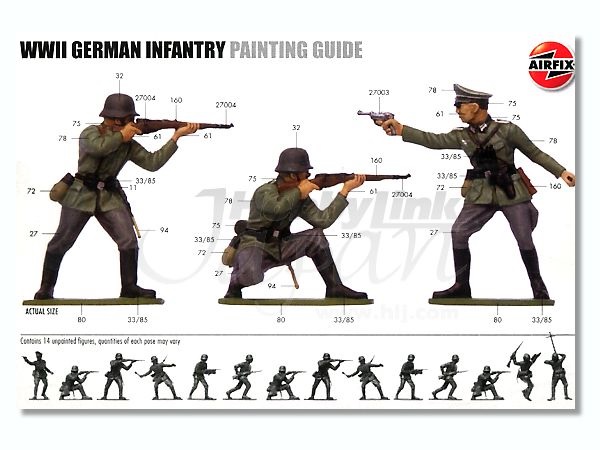
Here is the back of the box for the German set from the same company, Airfix. You can skip some of the details - Germans are really pretty easy to paint. You can ignore the numbers - they are a color guide to more-expensive enamel paints often used by modellers.
Some gamers like to play with unpainted figures. This is simply wrong! The whole point of the hobby is to create a small diorama which you use to recreate an historical scenario, played as a game. The aesthetics are key to this. Serious wargamers will never play with unpainted figures - it is shameful. Don't do it. (You might as well just use cardboard counters, because it isn't historical miniatures gaming.)
Once the figures are painted, and completely dried, you will flock the bases. This is done the same whether it is for terrain pieces like trees or for the miniatures themselves. Some of the figures may need to be based on pieces of card stock before flocking (I do this with my MG teams, so they stay together, for instance). You can do this by gluing them on with Elmer's Glue-All. (Let this dry hard before flocking!) To apply flock, paint the base with brown paint, includig the edges, and then run it through a small dish of flocking until the flocking sticks everywhere the paint is wet. Once flocked and dry, the figure can be thoroughly sprayed with clear matte varnish. Once this dries, the figure is ready for gaming!
One nice thing about these acrylic paints is that they are easy to use: you can just shake the bottle, screw off the top, and use the paint right from the inside of the lid. If you want to mix colors, just do it on a spare piece of cardboard. Keep a jar of water handy for thinning and cleaning brushes (I use a paper towel for this). There is very little mess or fuss. It does make sense to find a shallow box with a lid, around 4-6 inches on a side (think Tupperware here): put your flocking in there, and use it as a dish to run the bases of figures and trees around in after you've covered them in brown paint. This is maybe the messiest part of the whole operation, and it isn't too bad.
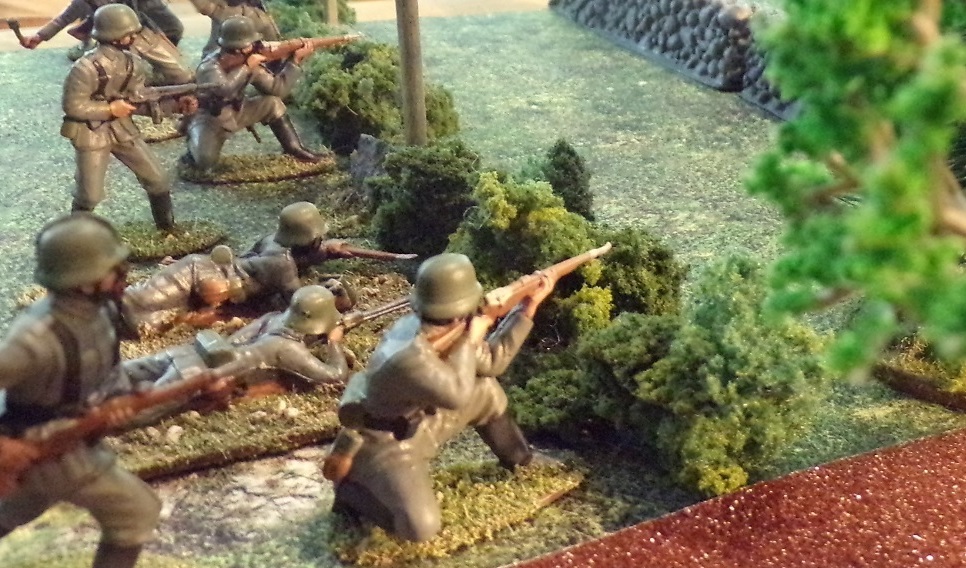
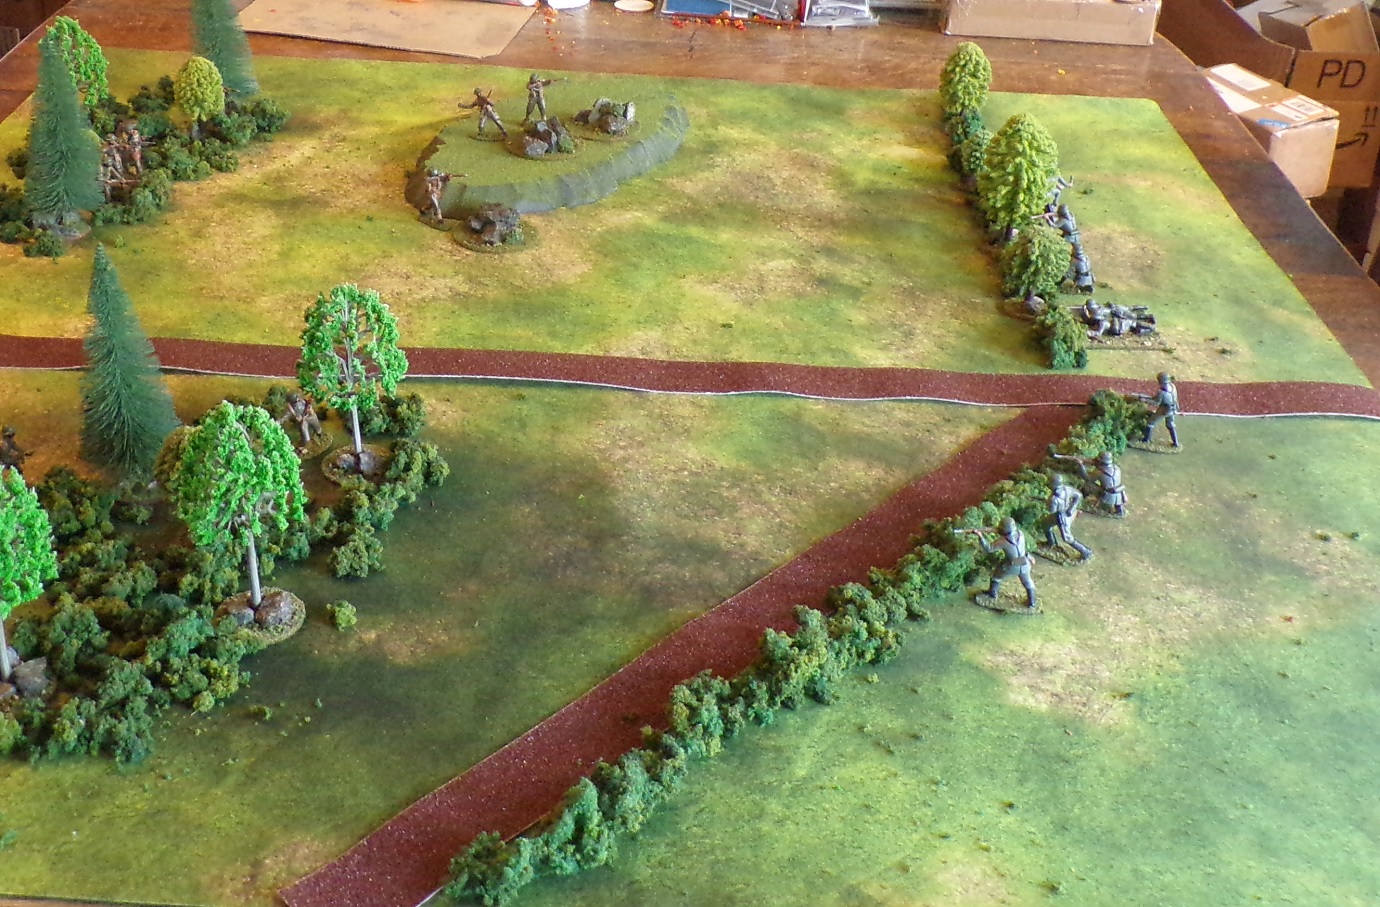
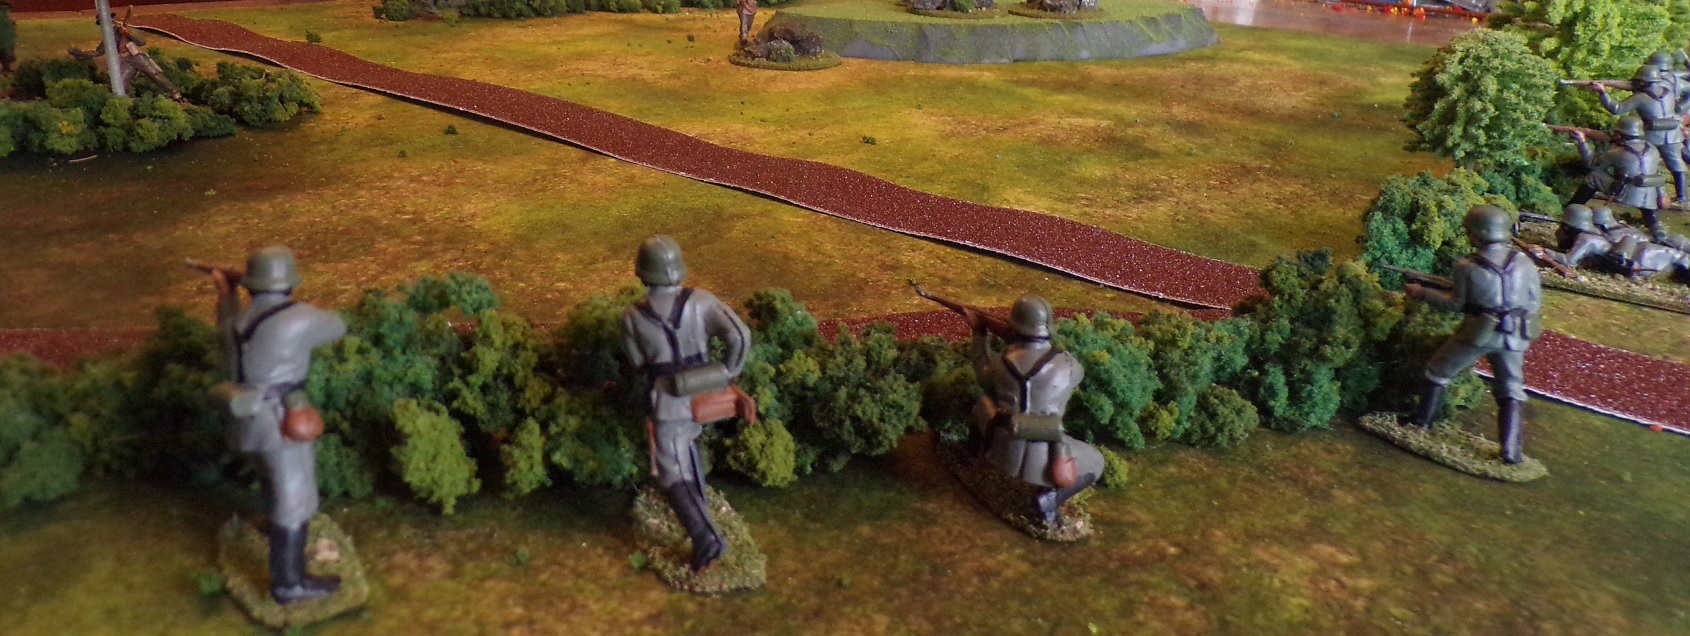
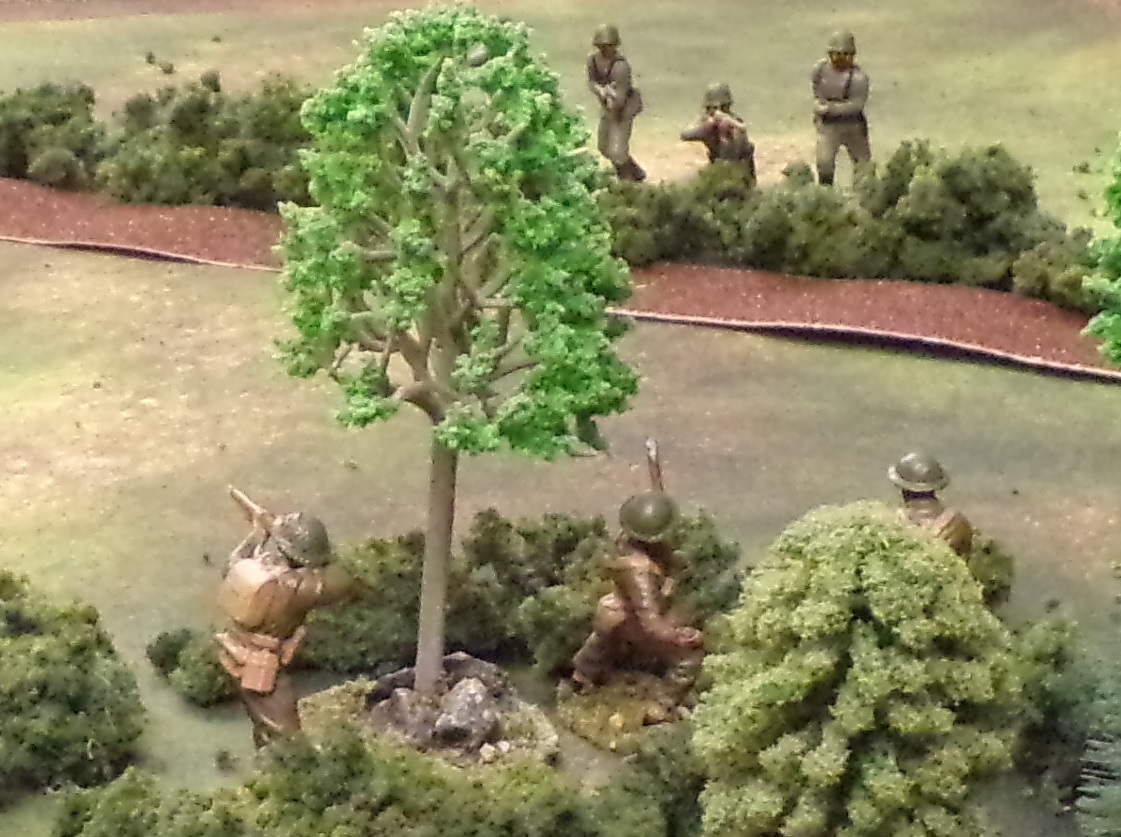
Here, we have set up the table with some terrain and figures as discussed above. You can see that while this may not be the most beautiful game in the world, it is certainly a decent-enough looking one. In order to write this article, I actually went through the entire process described, and - although I am a veteran of many decades of historical miniatures gaming, and own thousands of painted miniatures - I was quite pleased with the result. I will play this game happily! (Note that I ended up doing both British and US for the Allies, and the figures here are the British ones...)
The game mat here is a 4' x 4' one I bought, to give you a sense of the dimensions. If you look closely, you can see all the different terrain pieces I describe above.
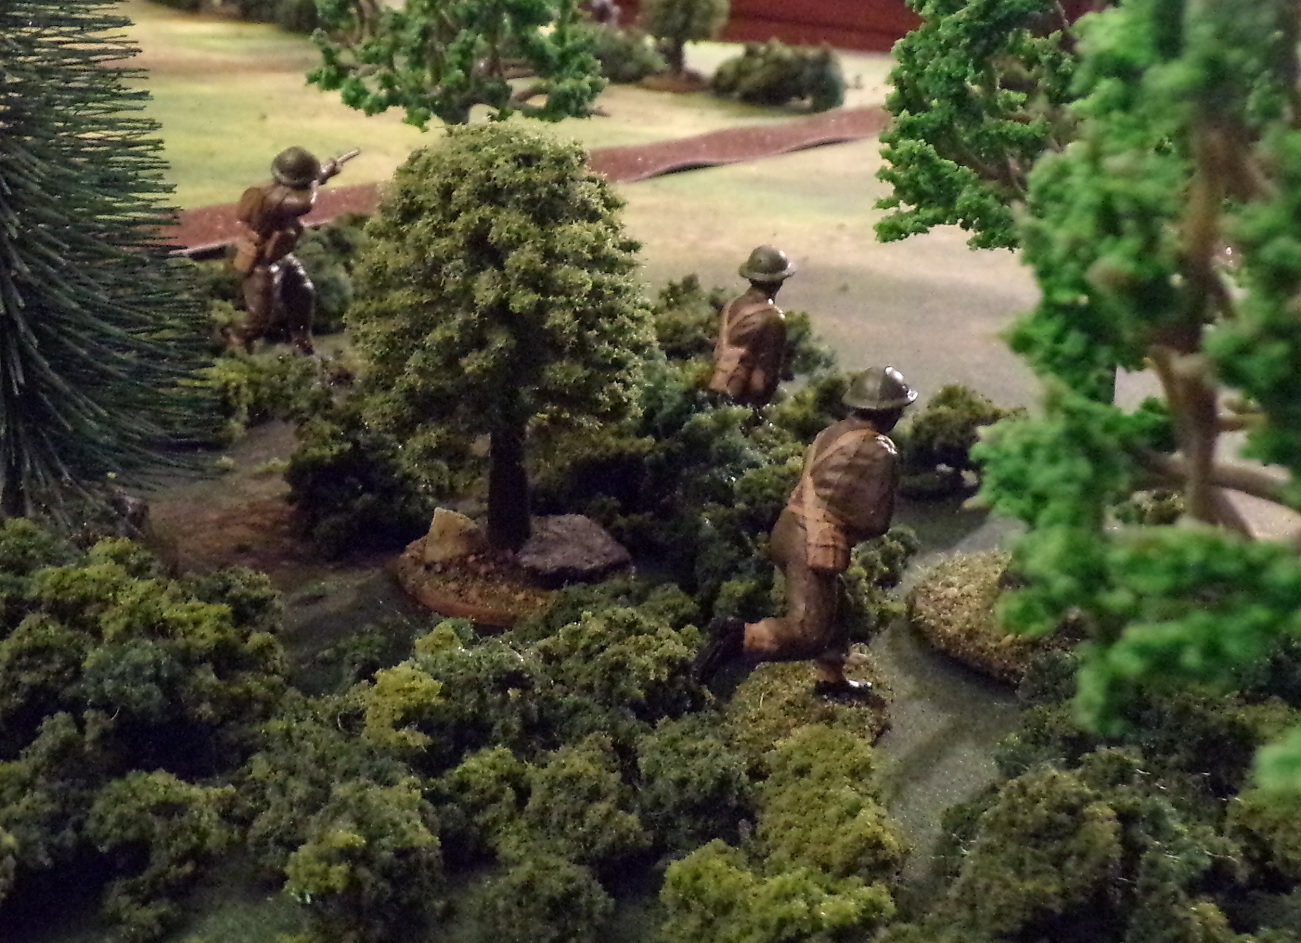
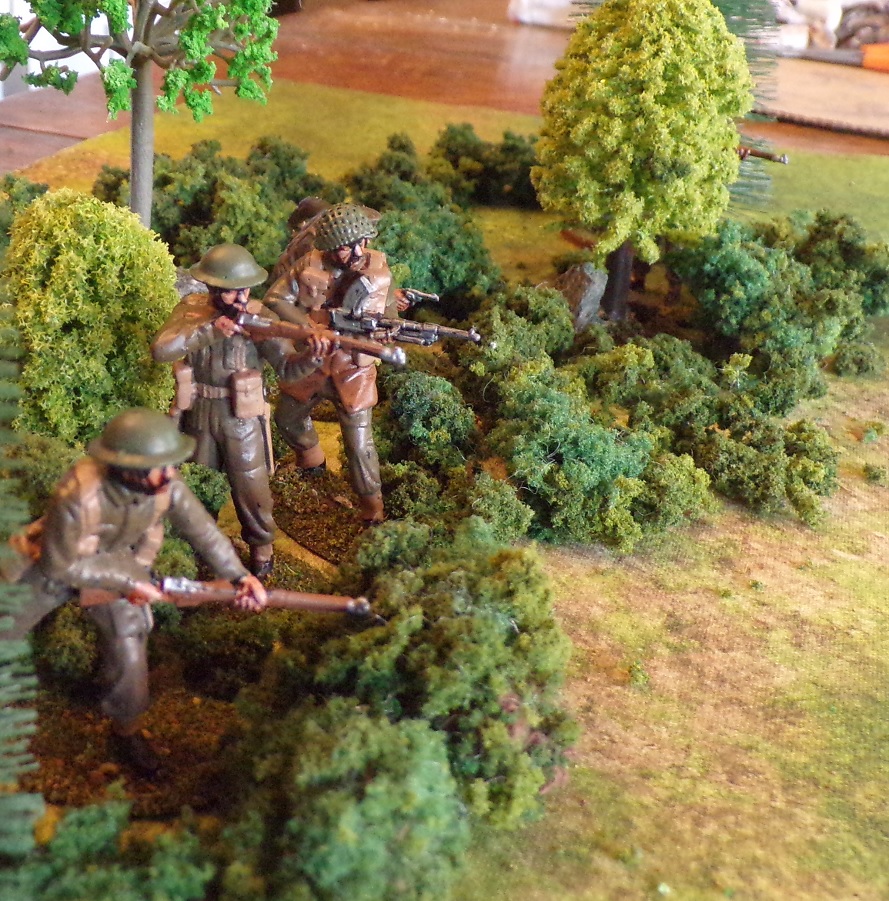
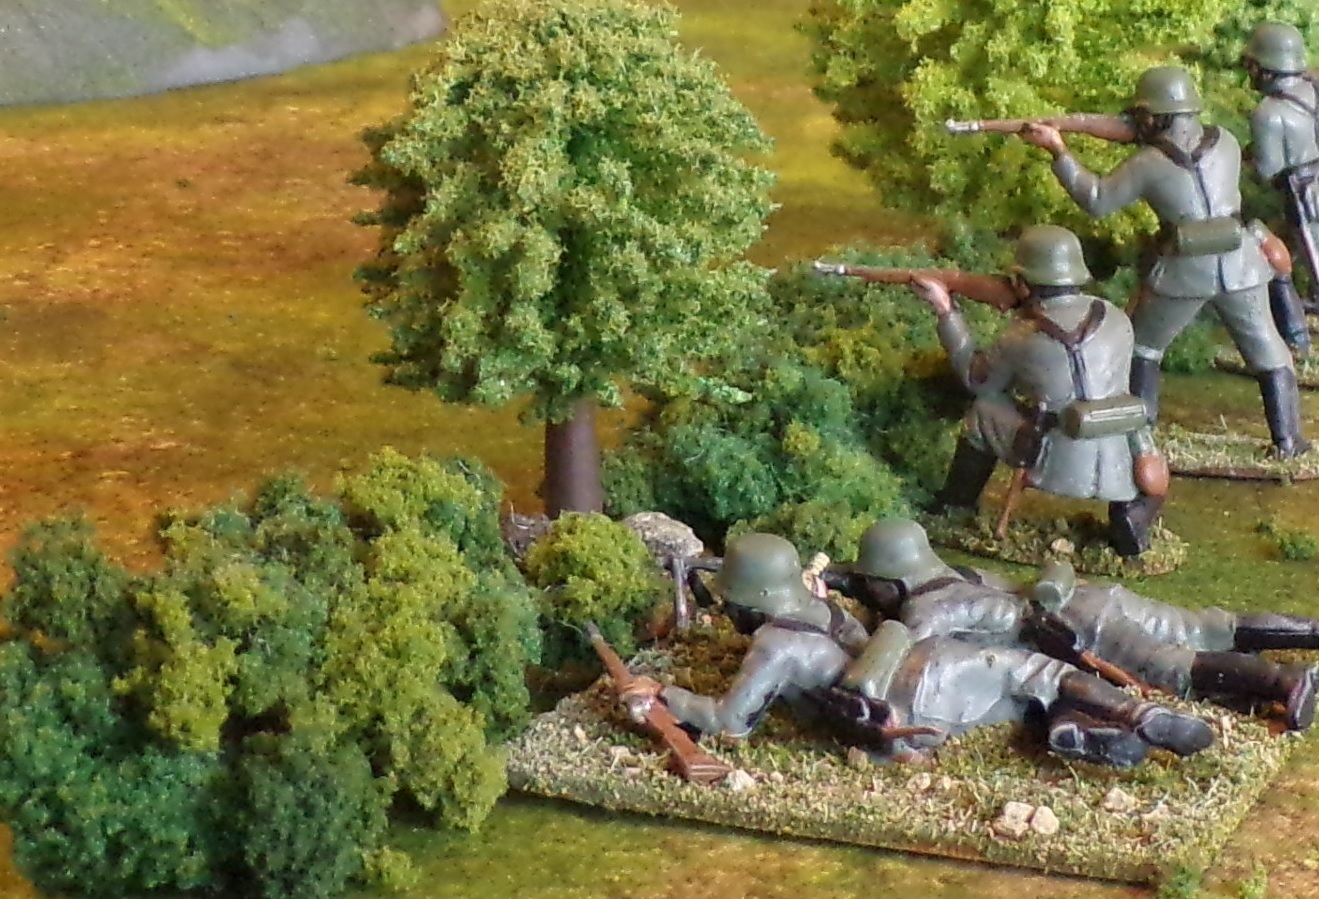
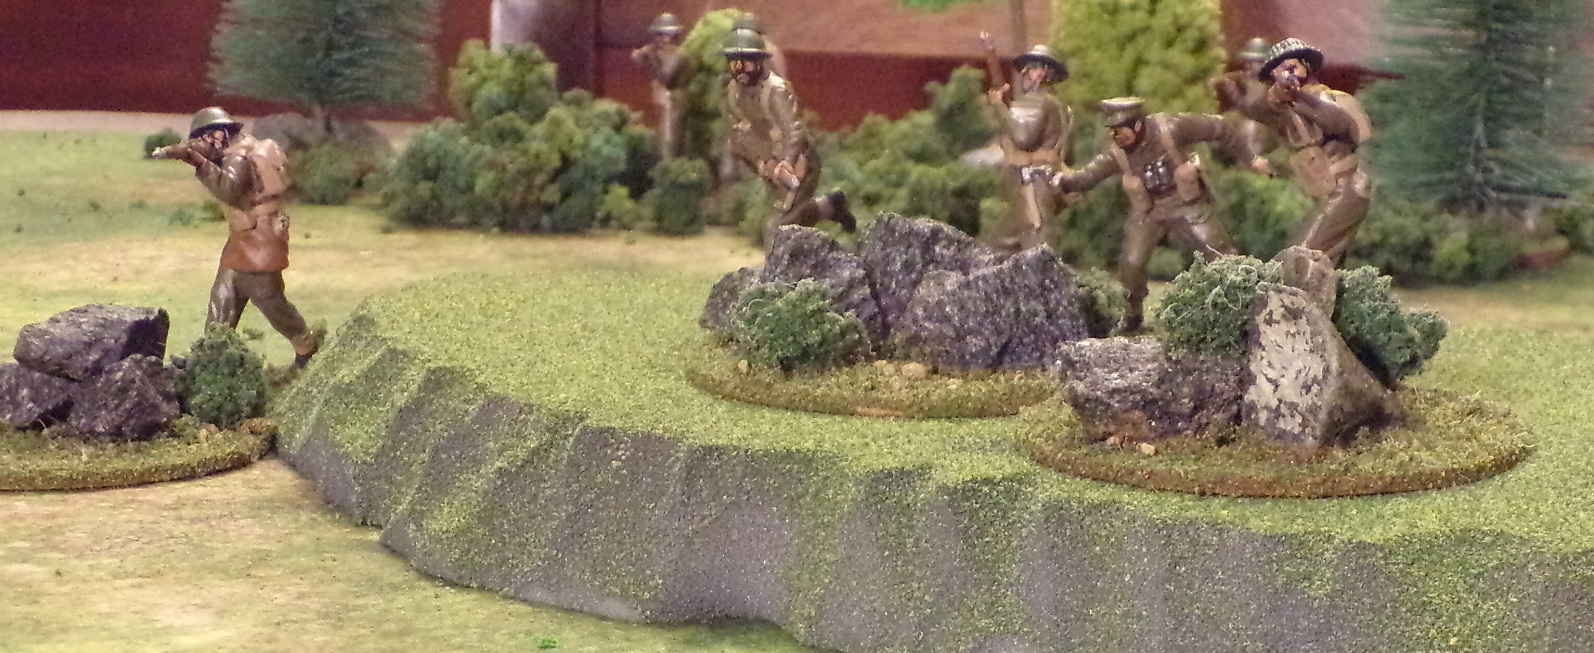
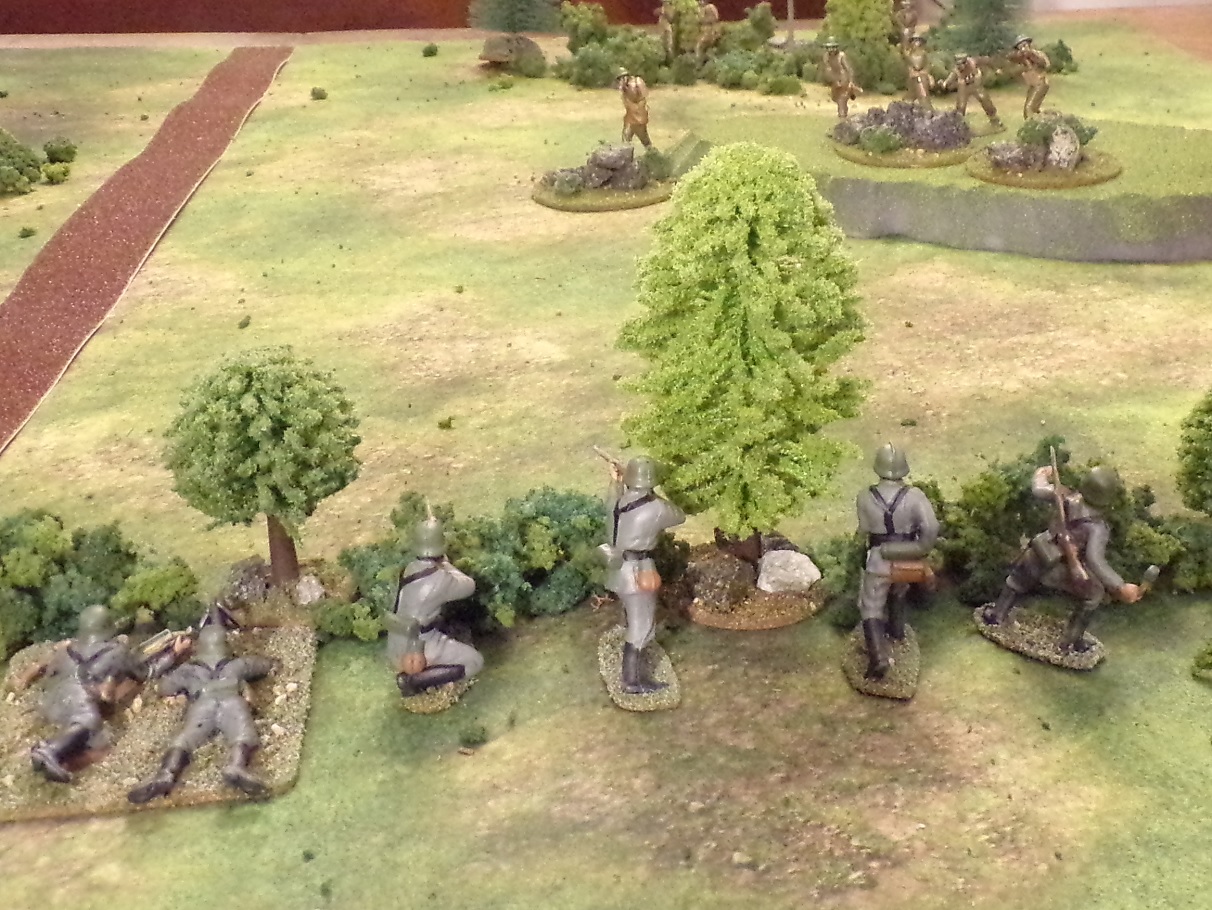
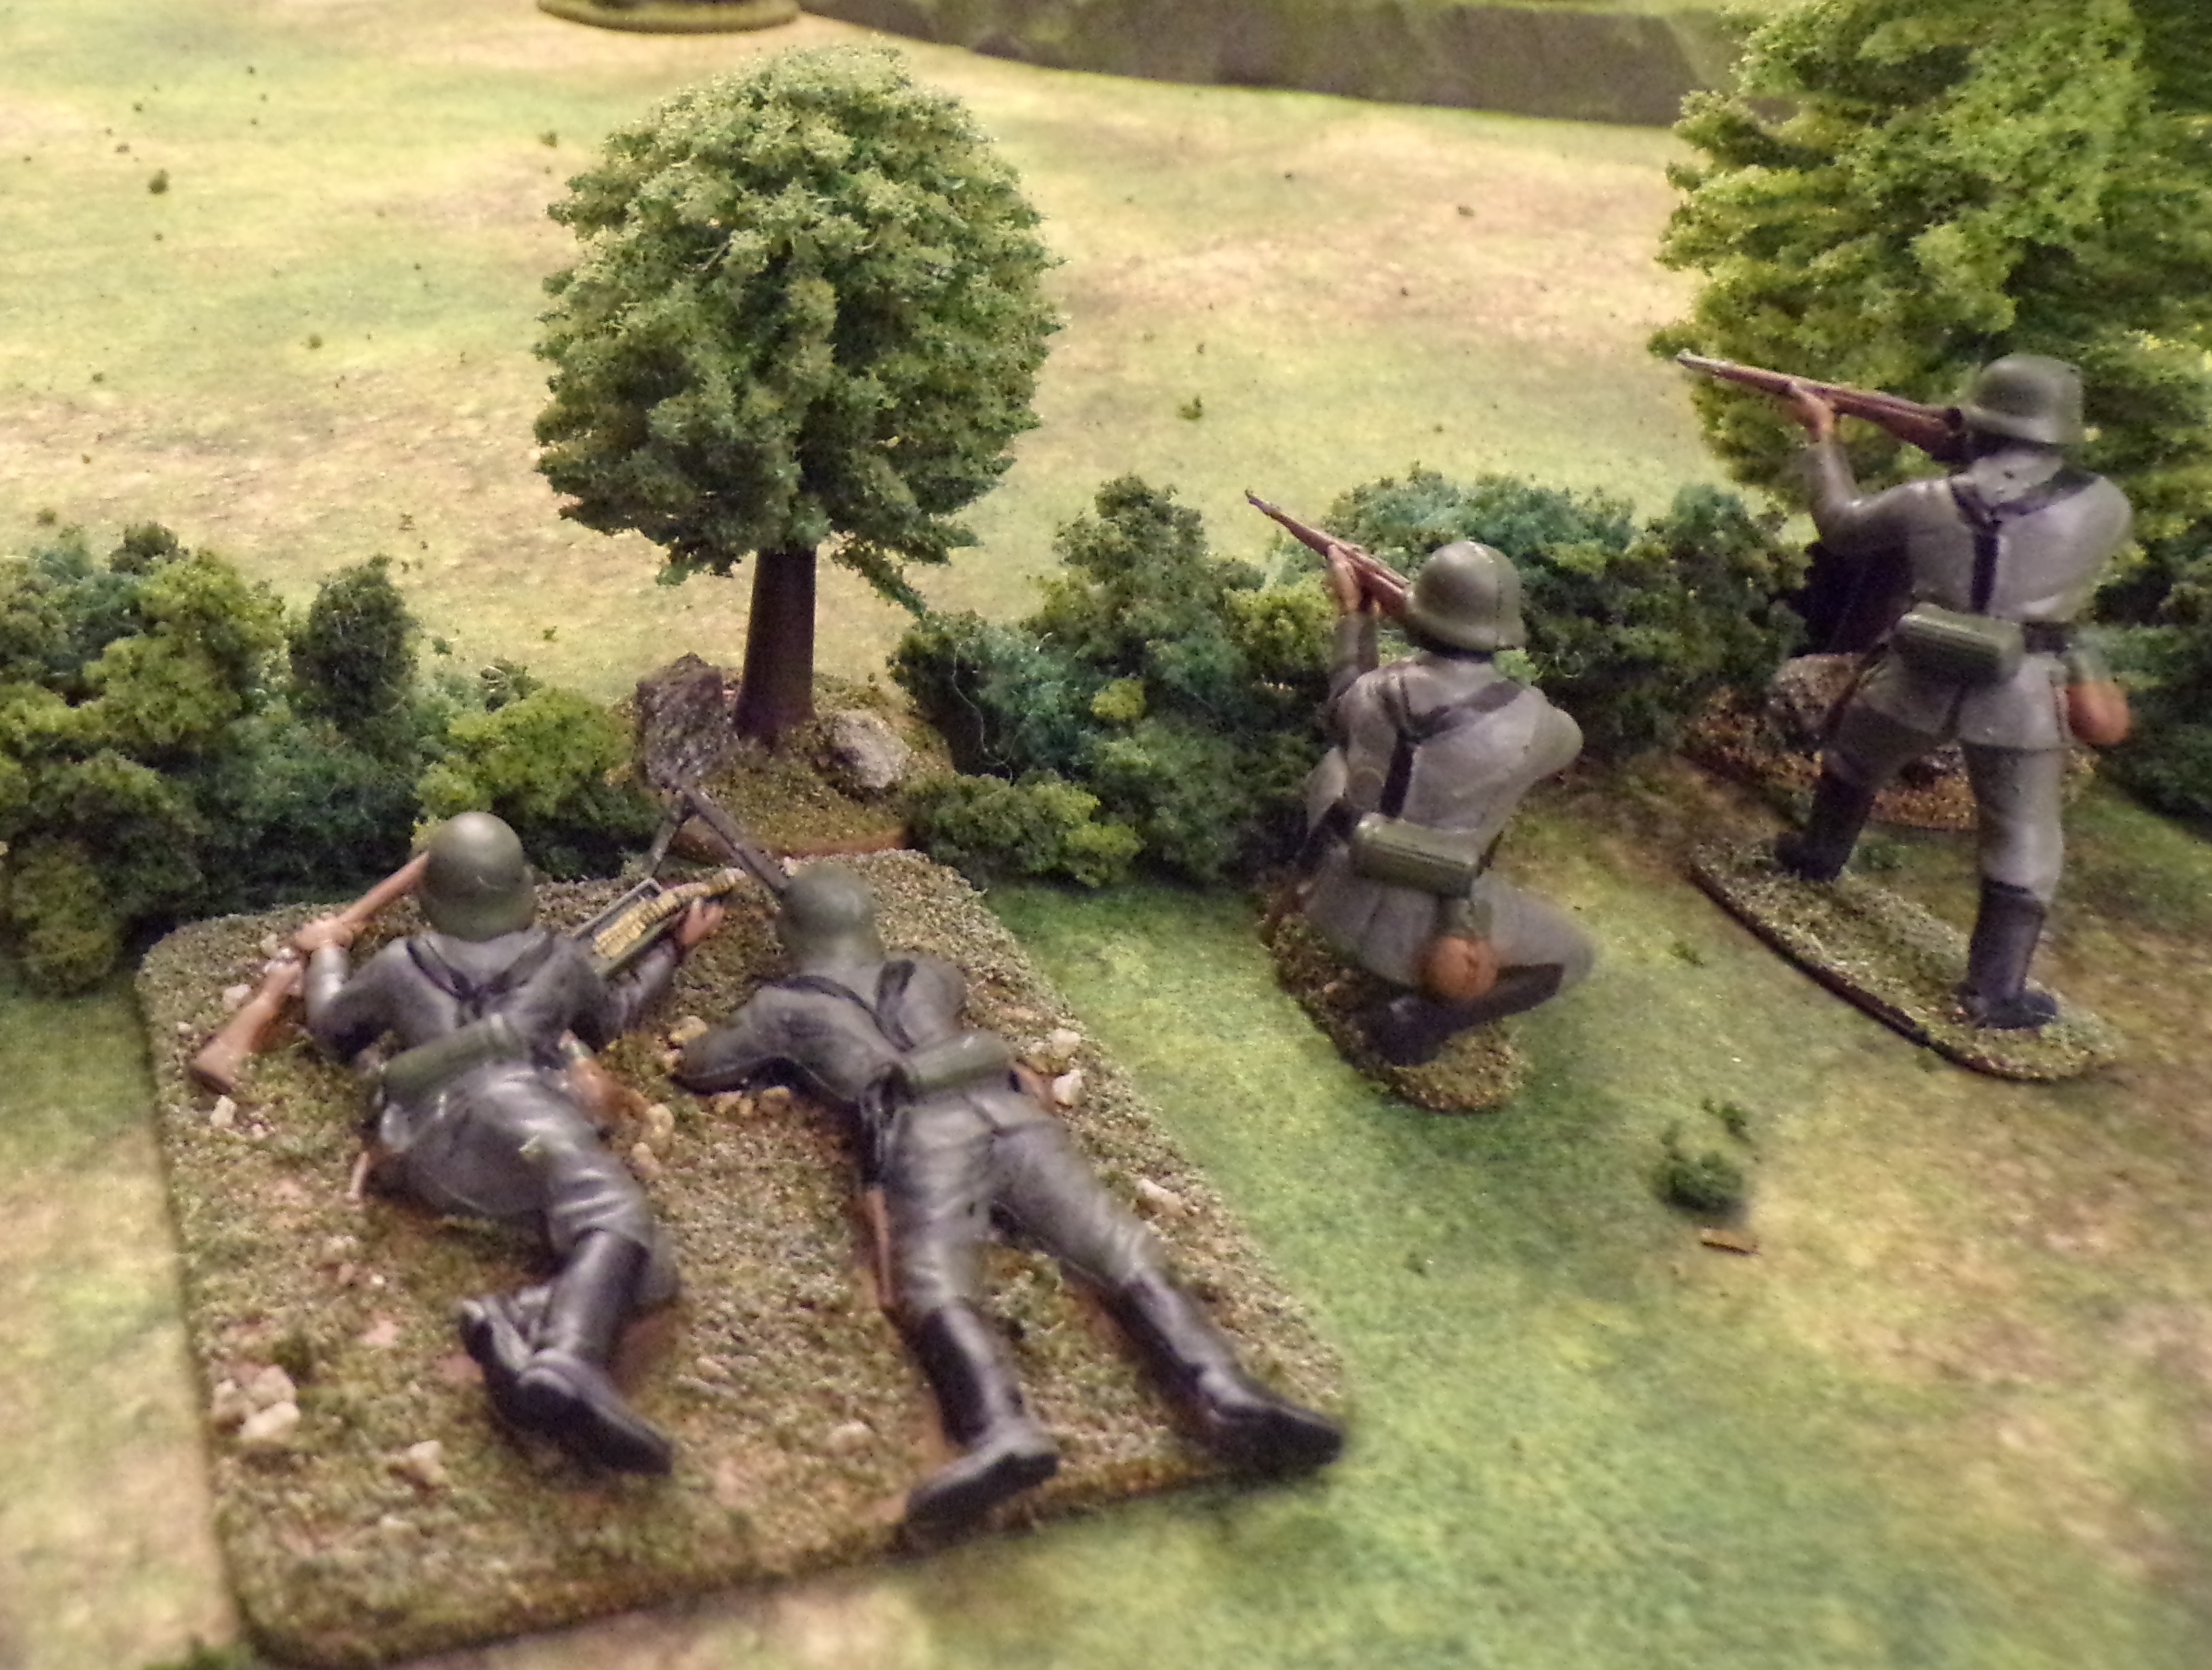
When selecting the armies to paint, I did a little research to determine which figures to work on first, so I could get a game on the table quickly. A German squad had a squad leader (Non-Commissioned Officer or NCO) armed with a submachinegun, a light machingunner and assistant, and seven additional riflemen. A US squad had a squad leader and an assitant squad leader (a corporal), a BAR gunner, an ammo carrier, an assistant BAR gunner, a grenadier (with a rifle grenade launcher), and six riflemen. All were armed with rifles except the BAR gunner. (My British section has a section leader with a Sten submachinegun commanding six riflemen, and an assistant section leader commanding a Bren gun group of a Bren gunner and one riflemen.)
These basic historical organizations will be the basis of our games, first with a single squad/section per side, and then adding additional ones. Once you have two or three squads/sections for a side, you can add some platoon command (an officer with a pistol and maybe a mortar, etc.) and play games which use larger forces (Bolt Action and Chain of Command both use the platoon as the basic force for each side). The Battle Order site provides useful information about the composition of WWII units. Note that in combat casualties would reduce the number of men, so if you are missing a figure or two you can still field an historical force - just say the missing guys are in the field hospital.
So, how much did it all cost? Miniatures wargaming is an expensive hobby, there can be no doubt, but it does have the benefit of becoming cheaper once you own a lot of the materials and tools. Also, once you have painted the miniatures, they are good for years of use, whereas many hobbies (like, say, golf) have a lot of on-going costs (like club memberships and greens fees) as well as fixed equipment costs. Historical miniatures wargaming is an inexpensive hobby once you have the armies, terrain, and rules in hand. You just need a table, time, and an opponent!
Below is the breakdown of costs for this project:
German and US 54mm Soft Plastic Infantry Figures, 2 Sets (Alternately, Hard Plastic 28mm): $40.00 ($65.00)
One Hour Skirmish Wargames (Rules): $22.00
Olive-Drab Military Blanket (Alternate, 3' x 3' Game Mat): $20.00 ($35.00)
2" Anti-Slip Tape, Brown (for Roads): $10.00
Foliage Clusters, Green: $10.00
Fine Turf flocking: $5.00
Clear Matte Varnish: $6.00
Matte Boards: $10.00
Model Trees, 32-Pack: $12.00
(Optional foam and spray paint for hills: $30.00)
Plastic Spray Primer: $7.00
Paints and Brushes: $30.00
________________________________
TOTAL: $172.00 ($252.00)
So, for less than $200.00 you can get into miniatures wargaming - not that bad, all things considered. And once you have the terrain, materials, and paints, adding another army won't cost much at all. For instance, if I want to add some Italians to fight against my US infantry in Sicily in 1943, it will only cost about $25.00: I would need to buy the figures and a couple of new bottles of paint to get the Italian uniform colors.
Classic Toy Soldiers sells this set of WWII Italian infantry made by BMC. They can be painted for the desert in a tan uniform or in the continental grey-green one. The Italians fought in North Africa, Greece, Sicily, and the Soviet Union. These "toy soldiers" are accurate depictions of the Italian army as it fought in WWII.
If I wanted to try a Napoleonic game, using the skirmish rules I already bought, then I would need to buy two sets of figures (say, some British riflemen and some French voltigeurs - both available from Armies in Plastic for less than $15.00 a set) and some new paints again (blue for the French, white for belting, etc.). As many wargamers will tell you, you tend to run out of storage space before you run out of money!
In terms of time, it took me only a total of 12 hours to build all the terrain I needed and to paint the figures. (I am an experienced painter, so it might take a beginner longer.) The goal here is to get a game on the table as quickly as possible - there is lots of time to paint bigger and new armies for different games, once this one is ready. It is important to note that the easiest way to get motivated to paint more figures is to play a game! This is why I am emphasizing the completion of a small project before doing more. You will get plenty of practice painting figures and building terrain over the years to come, but until you have a good reason to do it, it can seem like a chore. If you have the right motivation, however, it is really quite satisfying.
So - I am happy that I have met the challenge I set myself. $200.00 isn't nothing, but it isn't a huge investment, either. It turns out it really isn't too expensive or difficult to take the first step in what many of us have found to be a rewarding, life-long journey. If you are thinking about starting the hobby, I hope you found this helpful. Historical miniatures wargaming is a great way to spend time with friends, and is endlessly fascinating! Welcome to the ranks!